


How to Permanently Stop Windows 11 Upgrade Prompts

Welcome to our in-depth guide on how to permanently stop those pesky Windows 11 upgrade prompts. We understand how frustrating it can be when your system keeps asking you to upgrade, and we’re here to provide you with a solution that will help you regain control over your Windows updates.
Understanding the Windows 11 Upgrade Prompts
Before we delve into the solution, let’s understand why you’re seeing these upgrade prompts in the first place. Microsoft, as part of its continuous efforts to improve its operating systems, often releases updates and new versions. Windows 11, with its sleek design and enhanced features, is the latest offering from Microsoft.
These upgrade prompts are designed to keep your system up-to-date and secure. However, not everyone is ready to make the switch to Windows 11, and that’s completely okay. Maybe you’re content with your current version of Windows, or your system doesn’t meet the requirements for the new OS. Whatever the reason, we’ve got you covered.
Option 1: Adjusting Windows Update Settings
The first option we’ll explore is adjusting your Windows Update settings to prevent Windows 11 upgrade prompts from appearing. Here’s how you can do it:
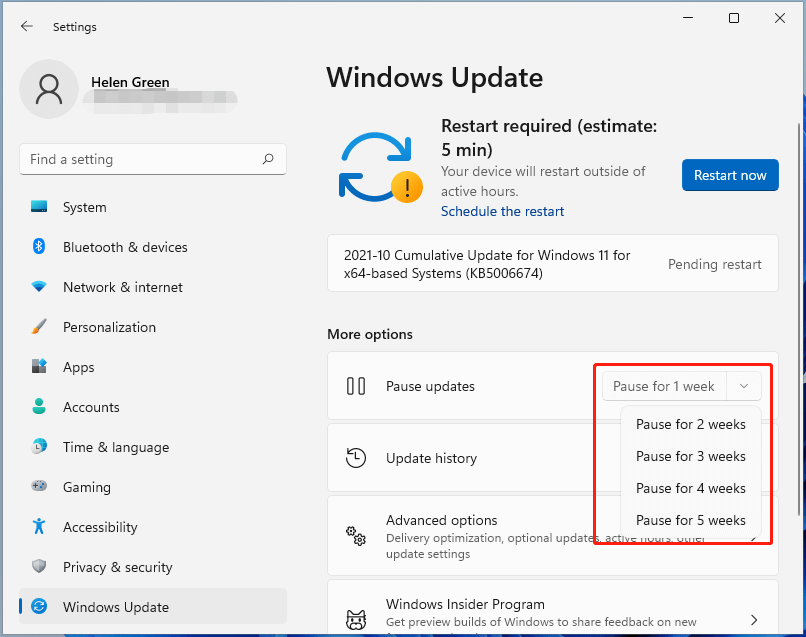
- Open Windows Settings: Click on the “Start” button, then click on the gear icon (Settings).
- Go to Windows Update: In the Settings window, click on “Windows Update” located in the sidebar.
- Advanced Options: Click on “Advanced options” to access more settings.
- Pause Updates: Under the “Pause updates” section, you can pause updates for up to 7 days. This won’t stop upgrade prompts permanently, but it can give you some time to decide.
- Choose a Deferral Period: Scroll down to the “Choose when updates are installed” section. You can defer feature updates for up to 365 days. This will prevent Windows 11 from being installed automatically.

Option 2: Using the Show/Hide Updates Tool
If the first option doesn’t fully meet your needs, you can utilize the “Show or hide updates” tool provided by Microsoft. This tool allows you to hide specific updates, including the Windows 11 upgrade. Here’s how you can use it:
- Download the Tool: Visit the Microsoft Update Catalog (search for it online), and search for “Show or hide updates tool.” Download and run the tool on your system.
- Hide the Windows 11 Update: Once the tool is running, it will scan your system for available updates. Look for the Windows 11 upgrade, select it, and click “Next.” The tool will hide the update, preventing it from being installed.
Option 3: Modify the Registry
For advanced users who are comfortable working with the Windows Registry, this option provides a more robust solution. Be cautious when modifying the Registry, as it can impact system stability if not done correctly. Here’s how you can proceed:
- Open the Registry Editor: Press “Windows + R,” type “regedit,” and hit Enter.
- Navigate to the Right Key: Go to “HKEY_LOCAL_MACHINE\SOFTWARE\Policies\Microsoft\Windows\WindowsUpdate.”
- Create a New Key: Right-click on the “WindowsUpdate” key, select “New,” and then choose “DWORD (32-bit) Value.”
- Name the Key: Name the new key “DisableOSUpgrade.”
- Set the Value: Double-click on the “DisableOSUpgrade” key and set the value to “1.”
Conclusion
By following one or more of the methods outlined above, you can successfully prevent Windows 11 upgrade prompts from bothering you. Choose the method that best suits your comfort level and technical expertise. Remember that staying informed about updates is essential for the security and functionality of your system.